How to Battle

How to Play Gladiators - After you create a gladiator
The Challenge
Each fight begins with a challenge. One player challenges another, "Arch Duke Death challenges Fragmentator " or “Dr. Clockwork has 11 wins and 5 losses. He is looking for a fight”.
The two gladiators who will fighting should have approximately the same number of fights (Development Points), so that both players agree it is a fair fight.
When the challenge is accepted, both players should look each other in the eyes and grunt, "Let's Rock!"
Before the Battle
Position the Health Tracker page, and the Luck Dice, Heal Dice, and Ammo Tracker page between the two players.
Mark each gladiators Health on the Health Tracker with a different coin, figure or marker.
If either gladiator has Luck Dice, Heal Dice or Ammo to keep track of, mark these on the Luck, Heal, and Ammo Tracker. You can use dice to keep track.
Initiative
To determine which gladiator has the first attack in the battle, each player rolls Initiative Dice.
Each gladiator rolls a number of dice equal to their INITIATIVE rank, then totaling all dice. Whichever gladiator rolls the highest initiative will attack first. Thereafter, the gladiators take turns attacking.
For example, you and a friend just created their first gladiators, and neither player purchased any INITIATIVE skill ranks. If you look on your Gladiator Personality Sheet, you will see your gladiator gets the first 2 ranks of INITIATIVE for free, so each player will roll 2 dice. If one player rolls a 7 (on the two dice) and the other player rolls a 10, the player who rolled the 10 goes first.
Attacking and Defending
Attacking
Let's say you won initiative and it is your gladiator's turn to attack. First, declare that you are attacking and which weapon you are using, "Attacking with the short sword (a B class weapon)."
How Many Attack Dice to Roll
When you attack with a weapon, you will roll a number of dice equal to the average of your ranks of ATTACK and ranks of the WEAPON:
Dice to Roll when Attacking = ( ATTACK ranks + WEAPON ranks ) / 2
- Round DOWN if you have 1 or more ranks in the WEAPON.
- Round UP, if you have 0 ranks in the WEAPON.
The best strategy is to keep your WEAPON ranks equal to your ATTACK ranks. This means most of the time, you will be rolling a number of Attack Dice equal to your ATTACK ranks.
Sometimes you Roll More or Less Attack Dice
Extra Attack Dice for Attacking Berserk
If you declare that you are “Attacking Berserk”, add 1 more die to your Attack Dice. If your gladiator has 8 or more ATTACK skill ranks, add even more dice. See “Fighting Styles - Attacking Berserk”.
Extra Attack Dice for Throwing your Weapon
If you are throwing your weapon, add more Attack Dice, for the weapon’s “Throw Bonus”. See “Throwing your Weapon”.
Less Attack Dice for Attacking Defensively
If you declare that you are “Attacking Defensively”, subtract 1 die from your Attack Dice. If your gladiator has 8 or more ATTACK skill ranks, subtract even more dice See “Fighting Styles - Attacking Defensively”.
Adding Luck Dice to your Attack Roll
If your gladiator has more wins than losses, you begin the battle with Luck Dice. Add as many Luck Dice as you want to the number of Attack Dice you are rolling. See “Luck Dice”.
The maximum luck you can use on any one roll, will double the number of dice you are rolling.
Always use a different color dice for your Luck Dice. If you roll a 1, 2, or 3 on any Luck Dice, you lose that luck die for the rest of the battle. Otherwise you can use it again.
Roll your Attack Dice
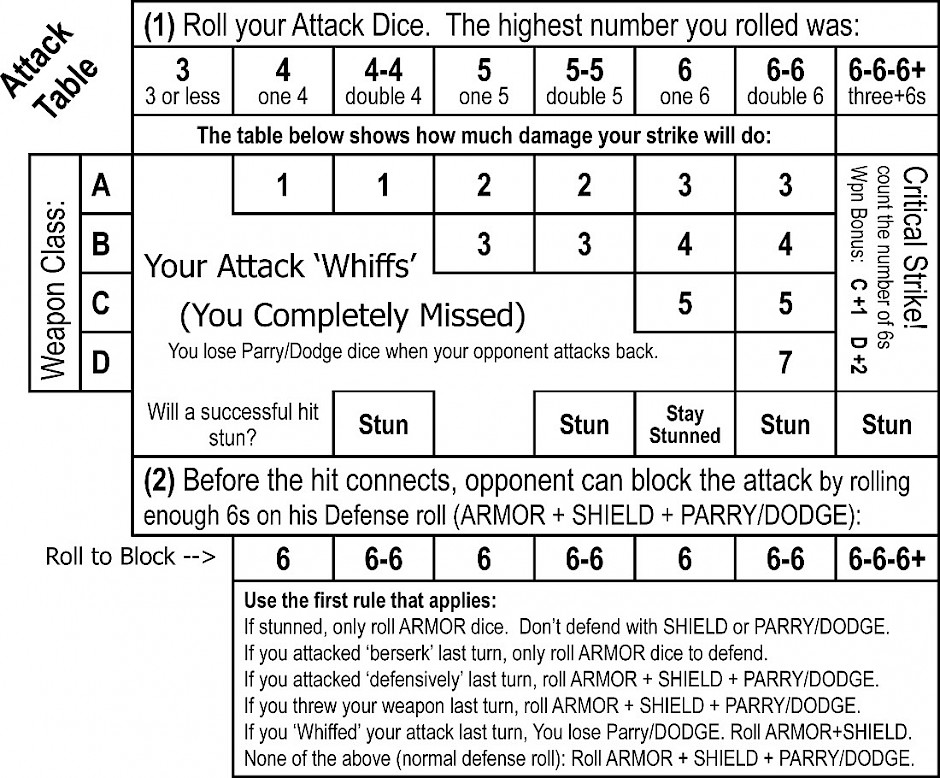
Roll all of your Attack Dice at once. Don’t add up or total the dice. You are hoping to roll high numbers. It depends on your weapon’s “Weapon Class” (A, B, C, or D) what you need to hit you opponent.
- With an A Class weapon, you need to roll at least one 4 (or higher) to hit your opponent.
- With an B Class weapon, you need to roll at least one 5 (or higher) to hit your opponent.
- With an C Class weapon, you need to roll at least one 6 to hit your opponent.
- With an D Class weapon, you need to roll at least two 6s to hit your opponent.
Look at your Attack Roll and answer: What is the highest number you rolled?, and How many of this number did you roll?
Now consult the Attack Table to determine if the attack might hit, how much damage it will do, if it will stun your opponent, and what defense roll your opponent needs to block it.
Gladiators Attack Table
Example Attack Roll
For example, your gladiator has 4 ranks of Short Sword (a B weapon) so you attack with 4 dice. You roll 2 5 5 6. Six is your highest number. You may not choose to use double 5s. You rolled one 6.
Consulting the Attack Table, read down the column with “one 6”. You see that with a B weapon a single 6 will hit and do 4 points of damage if it is not blocked. Also note, your opponent will need a defense roll with at least one 6 to block the attack.
Another example, Your veteran gladiator has 8 ranks of Claymore (a D weapon) so you attack with 8 dice. You roll 1 2 2 3 5 5 6 6. On the Attack Table you see that with double 6s a D weapon will do 7 points of damage if it is not blocked. Your opponent will need a defense roll of at least two 6s to block the attack.
Defending Against the Attack
Before your opponent takes any damage from the attack, he will have a chance to block it. There are three skills which are used to block an attack. These are PARRY/DODGE, SHIELD and ARMOR.
Defending with ARMOR
ARMOR provides the best defense for your gladiator. For each rank of ARMOR that your gladiator has, you will roll one die to defend all attacks from your opponent.
Defending with SHIELD
SHIELD is the next best defense for your gladiator. For each rank of SHIELD that your gladiator has, you will roll one die to defend attacks by his opponent, except:
- Your gladiator may not defend with his SHIELD if he is stunned!
- Your gladiator may not use SHIELD if he attacked berserk last turn.
Defending with PARRY/DODGE
PARRY/DODGE is the weakest form of defense for your gladiator. For each rank of PARRY/DODGE that your gladiator has, you will roll one die to defend attacks by his opponent, except:
- Your gladiator may not defend with his PARRY/DODGE if he is stunned.
- Your gladiator may not use PARRY/DODGE if he attacked berserk last turn.
- Your gladiator may not defend with his PARRY/DODGE if he whiffed his previous attack. Exceptions: If your gladiator attacked defensively last turn, or threw his weapon last turn (without going berserk), you do not lose your PARRY/DODGE.
How Many Defense Dice to Roll
Determining how many Defense Dice to roll is easy. Use the first rule that applies:
- You gladiator is stunned. Roll 1 die for each rank of ARMOR skill.
- You attacked berserk last turn. Roll 1 die for each ARMOR.
- You attacked defensively last turn. Roll 1 die for each ARMOR, SHIELD, and PARRY/DODGE.
- You threw your weapon last turn. Roll 1 die for each ARMOR, SHIELD, and PARRY/DODGE.
- You whiffed your attack last turn. Roll 1 die for each ARMOR and SHIELD only.
- Normal Defense (none of above). Roll 1 die for each ARMOR, SHIELD, and PARRY/DODGE.
Adding Luck Dice to your Defense Roll
If your gladiator has Luck Dice, you can add them to your Defense Dice if you wish. The maximum number of Luck Dice you can add to any roll is equal to the number of dice you would be rolling without luck. In other words, you can use luck to double the number of dice you are rolling, but not more. Make sure to use different color dice for you Luck. If you roll a 1, 2 or 3 on a Luck Die, you lose that Luck Die for the remainder of the battle.
Rolling your Defense Dice
Roll all of your Defense Dice at the same time. Count the number of 6s you rolled, and look on the Attack Table in the “Roll to Block” row to see if you blocked the attack.
For example, Your opponent attacked you with a B weapon and rolled a single 5 for his Attack Roll. Looking at the Attack Table, you see this will do 3 points of damage if you don’t block it with at least one 6. You have one rank of ARMOR, two ranks of SHIELD and three ranks of PARRY/DODGE. However, your gladiator whiffed his previous attack, so you can not use your PARRY/DODGE skill. You roll 3 dice for defense (1 for ARMOR and 2 for SHIELD). Your roll is 4 6 6. You easily block the attack, you only needed one 6.
Re-roll sixes for defense
If your defense roll contains at least one 6, but not enough to block the attack, you count and then re-roll the 6s. This rule applied to defense rolls only. - No other rolls in the game have this feature!
For example, Your opponent attacked you and rolled four 6s, a “4 dice critical strike”. Your gladiator needs four 6s to block the attack. Your defense roll is 1 3 5 6. You count the one 6 and roll that die again - Another 6! Now you have two 6s and you re-roll the 6 again. This time you get a 4. Your defense roll was double 6s (not the four 6s you needed), so the attack was not completely blocked. Your opponent will now roll on the Critical Damage Table to determine the damage. Luckily, he will roll two less dice when rolling for the damage, because you rolled 2 sixes trying to block it.
If you roll a 6 on a Luck Die when rolling to block an attack, you will not lose that luck die, even if you re-roll for the 6 and then roll a 1, 2 or 3.
If you whiff your attack
Look at the Gladiators Attack Table and you will see that your Attack Roll results in a whiff if you roll less than a 4 with an A weapon, less than a 5 with a B weapon, less than a 6 with a C weapon or less than double 6s with a D weapon.
If you whiff your attack your opponent does not need to defend (because you completely missed him). Your turn is over and you may not use your PARRY/DODGE skill to block your opponent if he attacks you on his turn.
If your attack is blocked
Your attack is blocked if you rolled high enough to hit your opponent, but he was able to block it with his defense roll. Your opponent receives no damage and your turn is over. You will defend normally when your opponent attacks (unless you attacked berserk).
If your hit your opponent
If your attack roll is high enough to score damage and is not blocked, your opponent receives the specified amount of damage.
Your opponent must subtract the damage from his health. Do not subtract the health on your Gladiator Personality Sheet. Keep track of the amount of health your gladiator has on the printed cardstock “Health Tracker” chart. Unless killed, when the battle is over, both gladiators will regain all of their lost health, ready for their next battle.
If you stun your opponent
If your Attack Roll hits with doubles or higher and your opponent does not block your attack, then your opponent's gladiator receives the indicated damage and is stunned.
A stunned gladiator must skip his next turn unless he is able to FOCUS.
Let's say that your opponent's attack roll was double 6s (6-6 on the attack table) and he attacked using a long sword (C weapon). Referring to the Attack Table, you will see that (if you do not block) this attack results in 5 points of damage and a stun. You will subtract 5 points from your gladiator's health and your gladiator will be stunned – Ouch! You will remain stunned until the end of your opponent's next turn (unless you can focus).
If you are stunned and can not focus, you must skip your turn, and your opponent gets his next turn immediately and can attack again. To make matters worse, since you are stunned, you will only get to defend with ARMOR when he attacks you.
Focusing
To recover from the stun your gladiator can attempt to focus. If your gladiator has at least one rank of FOCUS skill you may attempt to focus. Roll a number of dice equal to your gladiator's FOCUS ranks. If you roll at least one 6 your gladiator successfully focuses, you are no longer stunned and you do not lose your turn. If your gladiator successfully focuses you do not lose your turn and you may immediately attack.
What does "stay stunned" mean?
As explained above, if you stunned your opponent on your attack and he was not able to focus, you may immediately attack again. In this case, rolling a single 6 for your attack will result in your opponent staying stunned if he is not able to block with his ARMOR.
Stay stunned works just like stun, your opponent must skip his turn unless he is able to focus.
In this manner, you may keep your opponent ‘on the ropes’, by continually attacking until your Attack Roll is less than a 6, your opponent blocks with his ARMOR, your opponent is able to focus or he falls unconscious, into a coma or dies.
Critical Strikes
If your attack roll is 6-6-6 (triple sixes) or higher and your opponent does not block it by rolling an equal number of 6s, it is a critical strike.
A critical strike is a massive blow that does severe damage, always stuns and sometimes kills. If you roll a critical strike that is not blocked you will roll Critical Damage Dice to determine how much damage, pain and injury is inflicted on your opponent.
Critical Damage Roll
The number of critical damage dice you roll depends on several factors:
- The number of 6s you rolled for your attack
- Add + 1 die if you attacked with a C weapon
- Add +2 dice if you attacked with a D weapon
- Subtract -1 die for each 6 rolled in defense
Roll all of the dice at the same time and total all of the dice. Then add your weapon’s “Crit. Bonus” to the total. Look on the Critical Damage Table to see how much damage your critical hit did.
For example, if your attack roll was 6-6-6, you attacked with a long sword (C weapon) and your opponent rolled 0 sixes in defense, you will roll 4 Critical Damage Dice. 3 dice for rolling 6-6-6 and + 1 dice for using a C weapon. Roll the 4 dice and total them.
According to the Gladiator Weapons Table, the long sword has a Critical Damage Bonus of +1. So add +1 to the total you got.
Another example, if your attack roll was 6-6-6-6-6 (5 sixes), you attacked with a short sword (B weapon) and your opponent rolled 2 sixes in defense. You will roll 3 critical damage dice. 5 dice for rolling 5 sixes, + 0 dice for using a B weapon, -2 dice for the two sixes rolled in defense. Total the 3 dice, then add +1 (the short sword’s Crit. Bonus).
Look on the Critical Damage Table to see how much damage your critical hit did. All critical strikes stun as well.
Let's say your attack roll was 6-6-6 and you attacked with a war hammer (D weapon), your opponent did not roll any 6s in defense. You will roll 5 critical damage dice (3 dice for rolling 6-6-6 + 2 dice for using a D weapon). If you roll 3 5 6 6 4 on the 5 dice, adding them together you get 3+5+6+6+4 = 24. The war hammer has a Crit. Bonus of +2, so the total becomes 26.
You consulting the Bludgeoning Weapons Critical Damage Chart for the number 26 and read:
“Your blow caught him coming in and knocked him backwards. You don’t know exactly what broke inside him, but it was something. (18 Damage and Stuns)”
Your opponent receives 18 points of damage and is stunned.
Do not be tempted to read all the graphic descriptions on the Critical Results Charts. Wait until you roll a critical during battle. The descriptions will remain fresh and exciting battle after battle.
Attacking Berserk or Defensively
Each time your gladiator attacks, you can decide if she will attack normally, or opt to attack berserk or defensively instead.
Attacking Berserk
When it is your turn to attack, you may choose to attack berserk. Declare that you are attacking berserk before you roll your Attack Dice. When you attack berserk, roll an extra +1 Attack Dice on your Attack Roll. However, if your opponent attacks on his next turn, your gladiator may not defend with his PARRY/DODGE or his SHIELD. In other words, when you attack berserk, you may only defend with ARMOR if your opponent attacks you on his next turn.
Benefits and Penalties when Attacking Berserk
|
ATTACK ranks |
Benefit |
Penalty |
|
1 - 7 |
+ 1 Attack Die |
Lose all PARRY/DODGE and SHIELD.
Defend with ARMOR only |
|
8 - 11 |
+ 2 Attack Dice |
|
|
12 - 14 |
+ 3 Attack Dice |
|
|
15 or More |
+ 4 Attack Dice |
Some gladiators plan to attack berserk every turn. Gladiators using this strategy usually don’t spend any development points on SHIELD or PARRY/DODGE skills. By design, they rely solely on ARMOR, or nothing at all, for defense.
Attacking Defensively
When it is your turn to attack, you may choose to attack defensively. Declare that you are attacking defensively before you roll your Attack Dice. When you attack defensively, to following rules apply:
- You gladiator attacks with -1(or more) Attack Dice.
- Your gladiator gets +2 (or more) Defense Dice, should his opponent attack him on his next turn.
- Your gladiators attack can not whiff, although it might miss. This means your gladiator will always be able to use all of his defense if his opponent attacks him on his next turn.
- The maximum number of 6s your gladiator can roll on his Attack Roll is capped. If you do roll more 6s than the maximum, your extra 6s don’t count.
Benefits and Penalties when Attacking Defensively
|
ATTACK ranks |
Benefits |
Penalties |
||
|
1 - 7 |
+ 2 Defense Dice |
Can not “Whiff”. Defend with PARRY/DODGE, SHIELD and ARMOR |
- 1 Attack Die |
Max Attack roll: 6 - 6 |
|
8 - 11 |
+ 4 Defense Dice |
- 2 Attack Dice |
Max Attack: 6 - 6 - 6 |
|
|
12 - 14 |
+ 6 Defense Dice |
- 3 Attack Dice |
Max: 6 - 6 - 6 - 6 |
|
|
15 or More |
+ 8 Defense Dice |
- 4 Attack Dice |
Max: 6 - 6 - 6 - 6 - 6 |
|
Thrown Weapons
To throw a weapon, simply declare that you are throwing your weapon and mark down that you have thrown your weapon on the Luck Heal and Ammo Tracker, as you no longer possess it.
Advantages of Throwing a Weapon
- If your weapon has a Throw Bonus, you may roll this many extra Attack Dice. For example, if your weapon is the Battle Javelin and you have 4 ranks of ATTACK and WEAPON skill. Since the battle javelin has a throw modifier of +2, you will roll 6 (4 + 2) Attack Dice when you throw it.
- You can not whiff with a thrown weapon, only miss. Even if your attack roll is too low to hit and therefore misses, you may still use your PARRY/DODGE skill when your opponent attacks you on his turn. However, if you are berserk when you throw it, you do not get this advantage (you will defend with ARMOR only).
Disadvantages of Throwing a Weapon
After you throw a weapon, whether or not is hits your opponent, it falls to the ground. You will not be able to throw your weapon again until you pick it up. Your gladiator may bring several weapons into battle, up to 15 pounds total for his weapons and shield (a shield weighs 5 lb.).
This means that if your gladiator does not use a shield, he could bring 15 daggers (1 lb. each) or 5 javelins (3 lb. each) or 2 one handed axes (6 lb. each) or 3 battle javelins (5 lb. Each) or 2 widowmakers (7 lb. each), etc. The weight of each weapon is listed on the Gladiators Weapons Table.
Running Out of Ammo
Running out of ammo is a serious drawback for a gladiators who specialize in a throwing weapon, especially a weapon marked “Must be Thrown” on the Gladiator Weapons Table. If you run out of ammo, you can either brawl (fight without a weapon) or try to RETRIEVE WEAPON on your turn, to try to pick up some of your ammo.
Throwing Berserk
If you wish to throw your weapon berserk, you may do this as well. Roll the number of attack dice you would normally roll when throwing your weapon plus 1 (or more) for being berserk.
When you throw berserk, your gladiator may not defend with either his PARRY/DODGE or his SHIELD. A gladiator that throws berserk may only defend with his ARMOR, should his opponent attack on her next turn.
Unconsciousness, Coma and Death
If your gladiator's health falls below zero, he is subject to unconsciousness, coma or even death. Which of these might occur depends on how far below zero your gladiator's health is. Consult the Health Tracker chart.
Below Zero Health on the Health Tracker:
![]()
The bottom of the Health Tracker chart shows what condition you are in.
Unconsciousness
If your gladiator's health is between -1 and -10 at the beginning of your turn, your gladiator is subject to unconsciousness. You have two choices. Either you can accept defeat by falling unconscious, or you can attempt to stay awake.
To attempt to stay awake, roll the number of dice indicated on the Health Tracker chart. for example, if your gladiator's health is -7, you will roll 3 dice. If you roll at least one 6, your gladiator was able to fight unconsciousness and stay awake for another turn.
You may use Luck Dice when attempting to stay awake.
You will need to re-roll to stay awake at the beginning of each of your turns.
If your gladiator falls unconsciousness the battle is over, your opponent is victorious and your gladiator is defeated. Add a loss to your gladiator’s Win/Loss/Kill record.
Your gladiator suffers no permanent damage from falling unconsciousness. He may immediately fight again if he is not too humbled by the defeat.
Remember, you do not have to roll to stay awake. Instead, you may simply choose to give up the fight, fall unconsciousness, and take the loss. There is no shame in doing this.
Negative Health and Stunned
If your gladiator's health is below zero and he is stunned, you must roll to stay awake before you are allowed to roll to FOCUS.
Death’s Door
If your health is below -10, your gladiator is on “Death’s Door” and may die. When it is your turn you must roll the number of dice listed on the Health Tracker. If you do not roll a 6 your gladiator dies. Death is permanent. Your gladiators life has ended. This could be a good time to create a new gladiator.
You may use Luck Dice when attempting to stay alive.
If you do roll a 6 and your gladiator lives, now you must make a Fate Roll. See Fate Roll Chart.
Health -20 or below (R.I.P.)
If your gladiators health gets knocked below -19 your gladiator is killed dead. There is no way to survive this. Rest in Peace.
Fate Roll
If your gladiator’s health is below -10 (Death’s Door) on the Health Tracker, and you roll a 6 and manage to cheat death, you must make a Fate Roll. Roll 1 die (without using Luck) and consult the Fate Roll Chart.
Fate Roll Chart
|
Roll |
Your Fate |
|
6 |
Massive Adrenaline Rush – Your gladiator immediately heals 10 health, is conscious and not stunned. It is your turn. You may fight or quit the battle. |
|
5 |
Adrenaline Dump – Your gladiator immediately heals 7 health, is conscious, but is stunned. It is your turn, or you may quit the battle. |
|
4 |
24 Hour Coma - Your gladiator falls into a coma and may not fight until 24 hours from now. |
|
3 |
Develop an Insanity - Your gladiator falls unconscious, loses the fight, and develops an insanity. Roll on the “Random Insanity Table”. |
|
2 |
24 Hour Coma and Insanity – Your gladiator falls into a 24 hour coma, and may not fight again until tomorrow, 24 hours from now. Also, roll on the “Random Insanity Table”. |
|
1 |
Stare Death in the Face – Adrenaline Rush. Your gladiator immediately heals 8 health, is conscious and not stunned. It is your turn. You must win the battle, or your gladiator will die, even if his health is above -11. If you win and live, roll for an insanity on the “Random Insanity Table”. |
Luck Dice
Calculating your Luck Dice
If your gladiator’s wins exceed her losses she will have luck dice (otherwise, no Luck Dice). The amount of luck dice a gladiator has is: Wins – Losses = Luck.
For example, a gladiator with 10 wins and 4 losses will have 6 luck dice.
How Many Luck Dice Can you Roll
Luck dice can be used any time you are about to roll the dice for your gladiator (with a few exceptions). State how many luck dice you are using before you roll the dice and add that many extra dice to the number of dice you roll. The luck dice must be a different color than the other dice you are rolling. Also, you may not use more luck dice than the number of dice you were going to roll to begin with.
For example, your gladiator has 6 Luck Dice. He is attempting to use his FOCUS skill. He has 2 ranks of FOCUS and so would normally roll 2 dice. You may add up to 2 luck dice to the roll, doubling the number to 4 dice. You would say “I’m attempting to focus and using 2 luck dice. The green dice are luck.” A 6 rolled on any of the 4 dice rolled would result in your gladiator successfully focusing. If you roll a 1, 2, or 3 on any of the Luck Dice (green dice), you’ll lose these Luck Dice (see below).
Another luck dice example, your gladiator has 6 ranks of ATTACK and is attacking berserk, so you will normally be rolling 7 Attack Dice. You can add up to 7 Luck Dice (if you have that much Luck), and now roll 14 Attack Dice!
Loss of Luck Dice
Any of the luck dice that land on a 1, 2 or 3 lost for the remainder of the battle and can not be used again. Keep track of your gladiator’s remaining Luck Dice on the Luck, Heal, and Ammo Tracker.
For example, if your gladiator had 6 Luck Dice and rolled them all, rolling 1 1 2 2 4 6 (on the Luck Dice), you gladiator would lose 4 of his Luck Dice. He would then only have 2 Luck Dice remaining to use for the remainder of the battle. Before the next battle, your gladiator will regain all of his lost Luck Dice.
Luck Not Allowed for …
If your gladiator has Luck Dice, you can use them for almost any dice roll in the game, with these four exceptions:
- SIGNATURE MOVE
- Critical Damage Table Rolls
- Fate Roll Table Rolls
- Random Insanity Table Rolls
After the Battle
Your Gladiator’s Win, Loss and Kill record
See that near the top of your Gladiator Personality Sheet, there are boxes to keep track of your gladiator’s wins, losses and kills. After each battle, you must update your gladiator’s fight record.
If your Gladiator Wins the Battle
If you pummel your opponent into unconsciousness, credit you gladiator with a win and update the “Wins” box on your Gladiator Personality Sheet.
Your gladiator is awarded 3 development points for the win. You may save these 3 development points for later use, or spend them immediately on training to improve an existing skill, or to learn a new one.
If your Gladiator Loses the Battle
If your gladiator is the first to fall battered and bloody to the floor of the arena, you must record the battle as a loss on his personality sheet.
Your gladiator is awarded 2 Development Points for the loss. You may save these 2 Development Points for later use, or spend them immediately on training to improve an existing skill, or to learn a new one.
Unused Development Points Go in the “Bank”.
If you are saving your gladiators Development Points, keep track of these unused Development Points where it says ‘Bank’ on you Gladiator Personality Sheet.
If your gladiator kills his opponent
If your opponent is decapitated, disemboweled, thrashed into a lifeless state, bludgeoned to death or otherwise killed, credit yourself with both a win and a kill.
Your gladiator is awarded 3 Development Points for the win and an additional 2 for the kill. You may save these 5 Development Points for later use, or spend them immediately on training to improve an existing skill, or to learn a new one.

Draw a grave stone with the name of the gladiator you killed and the date of his demise on the bottom margin of your Gladiator Personality Sheet.
If your gladiator is killed
If your gladiator is killed, he may never fight again and enters the graveyard, joining the corpses of other long forgotten heroes of battles past. Your opponent should draw a tomb stone for your gladiator in the grave yard, located on the bottom of his Gladiator Personality Sheet.
This concludes the basic rules to the Gladiators Combat System. If you bring this rule book, a few gladiators, some Gladiator Personality Sheets and a pocket full of dice, you can battle any where any time you and one or more friends have 10 minutes to spare. Don’t forget, before each battle, ya gotta grunt “Let’s Rock!”
Have Fun
Tenzing Kernan